Files that will help teach you or guide you in finding the measurements for your Trailer Axles.

Trailer Axle Measurement Guide – TowParts.com
When working with trailer axles, a few key measurements are essential to ensure proper fitment and performance. Accurate measurements are crucial to avoid unnecessary wear, damage, or safety issues. Below, we’ll explain how to measure your axle with confidence.
Getting Started
To make the process easier, it’s best to remove your tires and wheels before taking measurements. This allows for more precise readings. If removing them isn’t possible, you can measure from the center of one tire to the center of the opposite tire. Having a friend assist by holding one end of the tape measure is helpful but not absolutely necessary.
Hub Face Measurement
What is it?
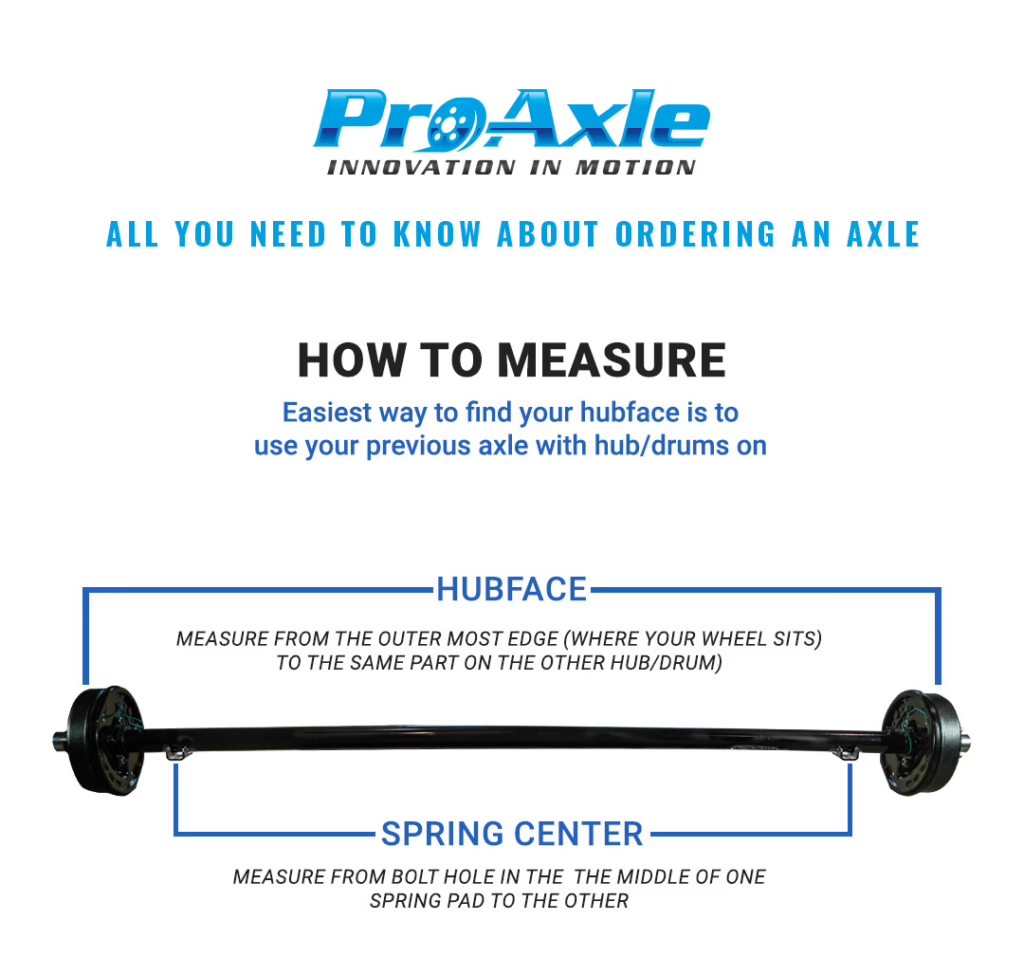
The hub face measurement is the distance from the outer face of one hub (where the wheel mounts) to the outer face of the opposite hub. This is the most important measurement when replacing or upgrading an axle.
How to measure:
1.Hook your tape measure to the outer face of one hub (the side facing the wheel).
2.Extend the tape measure across the axle to the outer face of the hub on the opposite side.
3.Be careful not to measure to the inside face of the hub—measure only to the outer face for accuracy.
Spring Center Measurement
What is it?
The spring center measurement is the distance between the centers of the leaf springs. This measurement is critical for proper axle placement and load distribution. If the springs are installed incorrectly, it can lead to bent axles and unsafe towing conditions.
How to measure:
1.Have a friend hold one end of the tape measure at the exact center of one spring.
2.Stretch the tape measure to the exact center of the opposite spring.
3.If you’re working alone, hook the tape measure on the outside edge of one spring and measure to the inside edge of the opposite spring. Subtract the width of the spring to determine the center-to-center distance.
Tips for Accurate Measurements
•Always double-check your measurements before ordering or installing a new axle.
•If you’re unsure or need help, reach out to our experts at TowParts.com for guidance.
•Use a high-quality tape measure with clear markings to avoid errors.
Pro Tip: Keep these measurements handy when contacting TowParts.com for axle replacements or upgrades. Our team is happy to assist you with any questions or concerns!


Trailer Axle and Hub Selection Guide – TowParts.com
Proper axle positioning and hub selection are essential for building or repairing your trailer. Here’s a detailed guide to help you make the right choices with confidence.
How to Purchase the Correct Trailer Hub or Drum
Selecting the right hub or drum is a critical step in repairing your trailer axle. Follow these simple steps to ensure you get the correct fit:
Step 1: Remove the Hub or Drum
Carefully remove the hub or drum from your trailer axle. This will allow you to measure and inspect the components for identification.
Step 2: Measure the Bolt Pattern
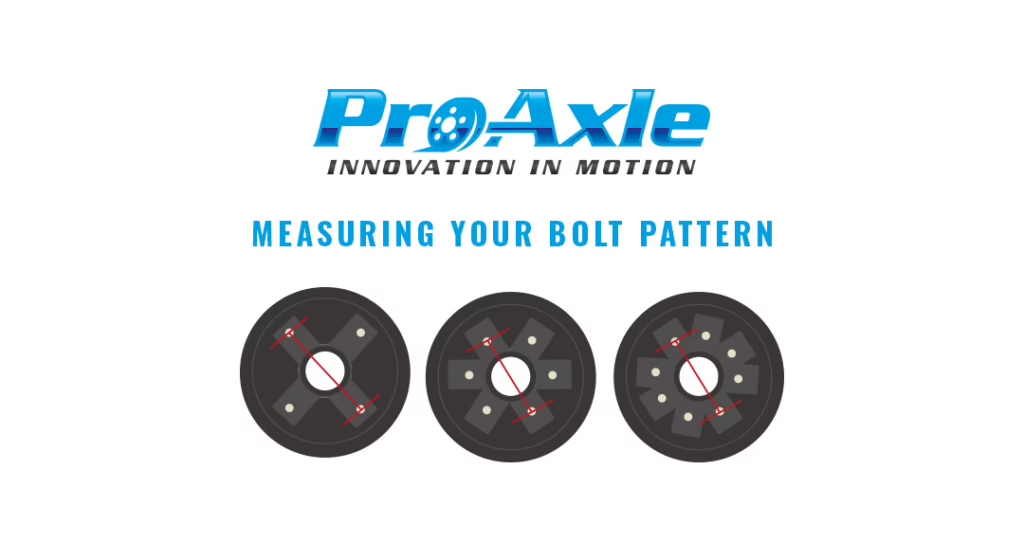
Determine your axle’s capacity by measuring the bolt pattern. This step is crucial if the capacity is unknown. Use a bolt pattern diagram to identify the correct measurements.
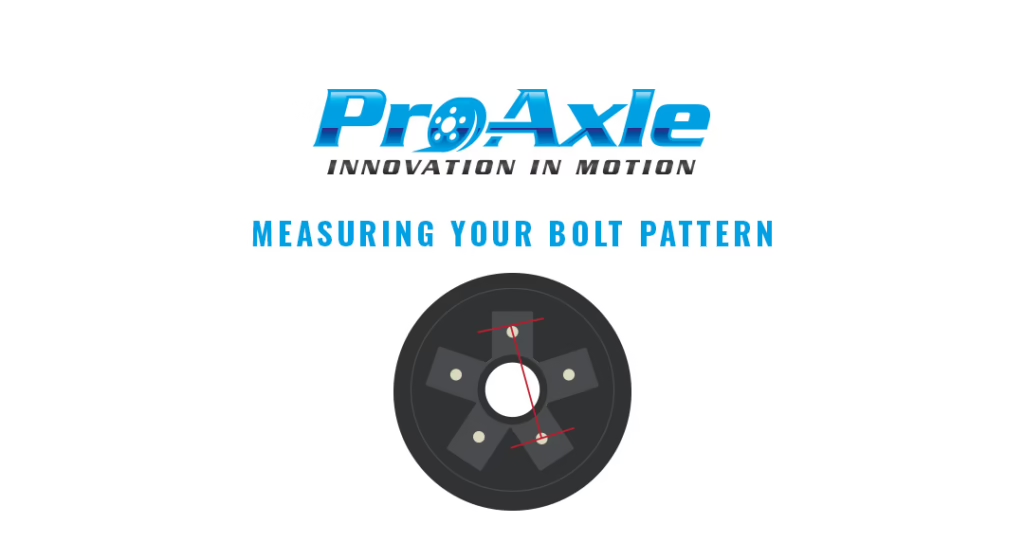
Helpful Tip: A 5-lug bolt pattern can sometimes be tricky. Use our bolt pattern guide for accurate results.
Step 3: Identify the Bearings and Seal
1.Remove the front and rear bearings and the seal from the hub.
2.Look for numbers stamped on the bearings. These numbers correspond to the spindle size.
3.If the numbers are not readable, measure the inside dimensions of the bearings and seal using calipers.
4.Refer to our bearing measurement guide for step-by-step instructions.
Step 4: Select the Best Hub or Drum for Your Needs
Once you have the measurements and information, choose the hub or drum that fits your requirements.
Need Help?
If you’re unsure, the TowParts.com team is here to assist! We’ll guide you through selecting the correct hub or drum to ensure a perfect fit for your trailer.
Why Choose TowParts.com?
•Expert Assistance: Our knowledgeable team is ready to help with your trailer needs.
•High-Quality Products: We offer durable, reliable parts built to last.
•Comprehensive Resources: Explore our website for diagrams, measurement guides, and installation tips.
For more information, contact us at 1 (888) HAUL 360 or visit TowParts.com. Let us help you get back on the road safely and efficiently!
Files that will help teach you or guide you in finding the measurements for your Trailer Axles.
Answer:
•Identify the Bolt Count: Start by counting the number of bolt holes (e.g., 4, 5, 6, or 8).
•Measure the Pitch Circle Diameter (PCD):
For even bolt patterns, measure from the center of one bolt directly across to the opposite bolt.
For odd-number patterns, measure from the. center of one, skip one, to the center outside of the third.
• Check Consistency: Double-check your measurements to ensure that your wheel or drum will fit properly.
• Visual Inspection: Look for cracks, rust, or uneven wear on the hub face and drum.
• Feel for Vibration or Wobbling: When driving, any noticeable vibrations or misalignment can indicate that the hub or drum is warped or worn.
• Regular Inspection: Check the hub and drum at least once per season or before heavy towing. Look for signs of wear, rust, or damage.
• Cleaning: Keep the surfaces clean to remove any dirt or corrosion that could affect fitting and performance.
• Lubrication: Apply grease where recommended to reduce friction and prevent rust, following the manufacturer’s guidance.
• Professional Servicing: If you notice misalignment or significant wear, consult a trailer specialist to resurface or replace the components.
• Improper Fitment: A wrong bolt pattern or hub face measurement can result in wheels or brake drums not fitting securely.
• Poor Performance: Misalignment may lead to vibrations, increased tire wear, or even brake issues.
• Safety Risks: Ultimately, incorrect measurements can compromise the trailer’s handling and increase the risk of accidents during towing.
• Corrective Action: If you discover issues, it’s important to re-measure, adjust, or consult a professional for repairs or replacement to ensure a safe setup.
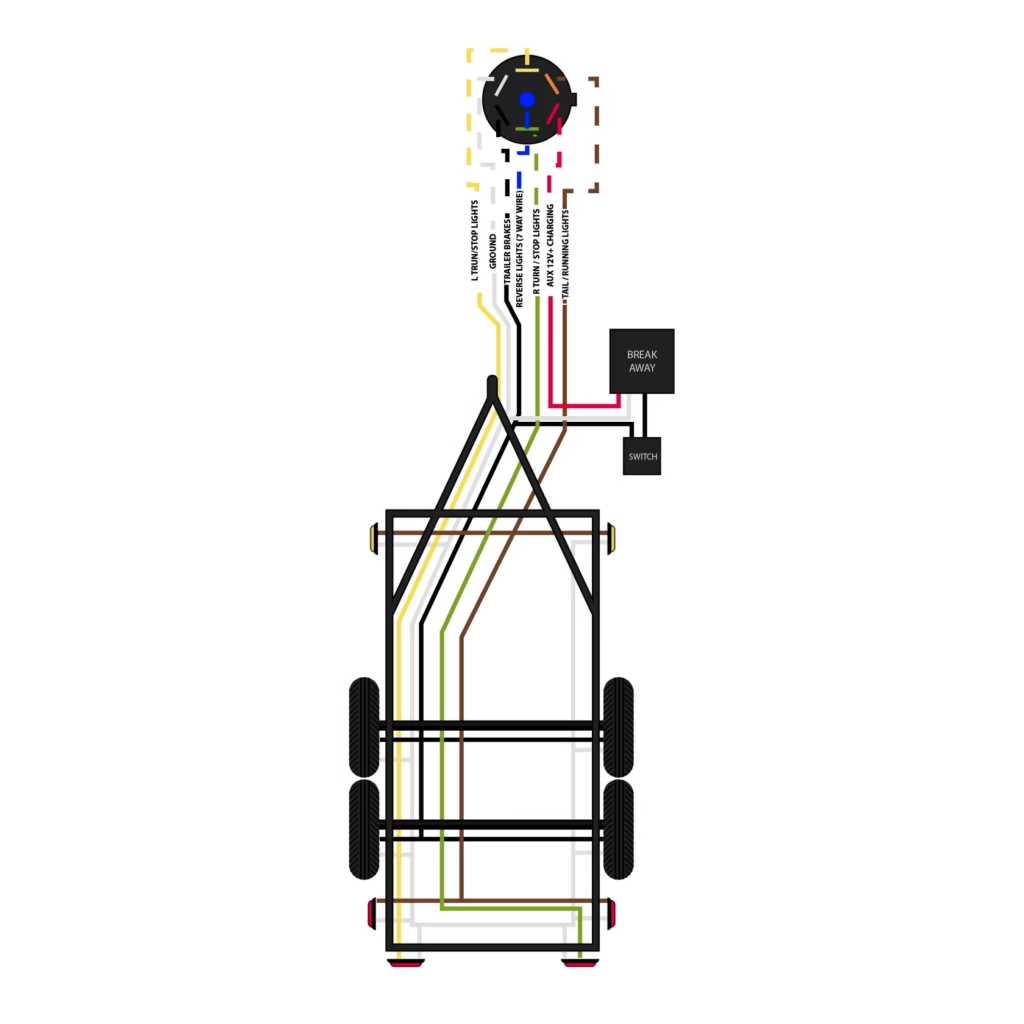
Downloadable Wiring Diagram
Yes, you can add brakes to your 2000 lb trailer axle!
To get started, you’ll want to ensure you have the proper components. Check out our selection for Trailer Axle Drums here: 2000 lb Hub and Drums.
You’ll also need the correct braking system for your setup. For that, we offer a variety of Trailer Brakes specifically designed for 2000 lb trailers. You can explore these options here: 2000 lb Trailer Brakes.
Together, these components will help ensure that your trailer axle is properly equipped and safe for use. Happy towing!
Answer:
• Electric Brakes: These are common and effective for trailers in this weight range. They provide proportional braking power based on the trailer’s load.
• Hydraulic Brakes: Found on some heavy-duty trailers, they offer consistent braking performance but require a hydraulic brake controller.
• Considerations: The choice depends on your trailer’s usage, compatibility with your towing vehicle, and local regulations. Check your manufacturer’s guidelines to ensure you choose the right type and capacity.

Answer:
• Wiring Basics: Trailer brake wiring usually consists of a ground wire, a positive brake signal wire, and sometimes additional wires (such as for reverse lights).
• Secure Connections: Ensure connections are clean, corrosion-free, and secured with proper connectors (quick disconnects, spade connectors, etc.).
• Fuse Protection: Most systems include a fuse to protect against shorts.
• Reference Diagrams: Always consult the wiring diagram provided by your brake manufacturer, as wiring colors and configurations can differ between models.
• Testing: Once wired, test the trailer brakes with the vehicle stationary before hitting the road. If your brakes aren’t activating properly, recheck the connections and consult the manufacturer’s instructions.
Answer:
• Definition: Burnishing is the process of ‘seating in’ the brake shoes or pads by gradually building up friction material contact.
• Purpose: This helps ensure that the brakes engage smoothly and evenly over the entire surface, leading to improved performance and longer life.
• Process:
• Initial Break-In: Lightly apply the brakes at low speeds in a controlled environment to generate minimal, consistent heat.
• Multiple Cycles: Repeat braking gently several times to smooth out the contact surface.
• Consequences of Skipping Burnishing: Without proper burnishing, you might experience uneven braking, reduced effectiveness, or premature brake wear.
Answer:
• Preparation:
• Verify you have the correct brake system for your trailer’s weight.
• Gather all tools and refer to the installation manual.
• Mounting the Brakes:
• Securely mount the brake assemblies (whether they are drum or disc brakes) to the trailer axle.
• Check that all hardware is tightened to the manufacturer’s specifications.
• Wiring:
• Run the wiring through the designated channels and secure them away from moving parts.
• Connect the wiring according to the wiring diagram.
• Adjustments:
• Adjust the brake shoes or pads for proper contact with the drum or rotor.
• Ensure there’s proper clearance as recommended in the instructions.
• Testing:
• After installation, test the brakes in a safe, controlled environment.
• Make any necessary fine-tuning adjustments for optimal performance.
Answer:
• Double-Check Wiring: Improper connections or a bad ground can lead to non-functioning brakes.
• Review Adjustments: Ensure the brake shoes/pads are adjusted correctly. Uneven contact may cause dragging or poor braking performance.
• Inspect Burnishing: Inadequate burnishing can result in a delay or inconsistency in brake engagement.
• Consult Documentation: Refer back to your manufacturer’s installation and troubleshooting guides for specific diagnostic tips.
• Professional Help: If you continue to have issues, consult a trailer brake specialist or mechanic for an in-depth inspection.
Yes, we do! We take quality and safety very seriously. Unlike some competitors (like Dexter Brakes), if your brake pads ever show signs of cracking, we stand by our product with a lifetime no crack warranty. This means that if you ever notice any cracks in your brake pads, we’ll replace them free of charge. Our commitment is to provide reliable, safe braking performance throughout the life of your trailer.
Answer:
Troubleshooting trailer brake issues can involve a few key steps. Here’s a simple guide to help you diagnose common problems:
1. Check the Wiring and Connections:
• Inspect All Wiring: Look for loose, frayed, or corroded wires. Ensure that connections (including the ground) are secure and clean.
• Verify the Fuses/Relays: Check that your trailer’s fuse and any brake relay are functioning correctly.
• Consult the Wiring Diagram: Refer to your brake manufacturer’s wiring diagram to ensure that each connection is correct.
2. Examine Brake Components and Adjustments:
• Inspect Brake Pads/Shoes: Look for wear, glazing, or uneven wear. Remember that cracked pads can trigger warranty claims if applicable.
• Check Brake Adjustments: Make sure the brake shoes or pads have the correct amount of clearance with the drum or rotor. Too much clearance can lead to delayed braking, while too little can cause dragging.
• Confirm Burnishing Process: If your brakes are new, verify that they were properly burned in. Inadequate burnishing can lead to inconsistent engagement.
3. Test the Brake Controller and Signals:
• Functionality Check: Ensure that the brake controller in your tow vehicle is calibrated and functioning as it should.
• Signal Verification: Use a multimeter to check that the proper voltage is reaching the trailer brakes when activated.
4. Look for Overheating or Binding:
• Overheating Signs: If the brakes feel ‘grabby’ or if you notice a burning smell during operation, the brakes may be overheating.
• Check for Binding: Ensure that the brakes engage and disengage smoothly. Binding or dragging can indicate issues with the adjustment or mechanical components.
5. Review Installation Details:
• Proper Mounting: Confirm that the brake assemblies and hardware are securely installed. Loose mounting can affect performance.
• Clearance and Alignment: Double-check that the hub face, wheel, and brake drum/rotor are properly aligned.
6. Consult Documentation and Support:
• Owner’s Manual: Revisit the installation and troubleshooting sections in your owner’s manual.
• Professional Assistance: If you’ve run through these steps and are still experiencing problems, consider consulting a trailer brake specialist or a professional mechanic.